Well it has been a busy time for me since my last post, so this one took a little longer to get out. Fuelled by the launch of Silverlight 2.0 and my desire to give it another go (being a WPF developer I was a little put off by the bareness of 1.0) and set about finding a little project I could undertake to help me learn the ropes. I had several ideas (read, future blog posts!), but the most logical was to port the 3D ellipse control I wrote in WPF across to Silverlight 2.0. It was a fairly straightforward port and a real eye-opener to what the differences between Silverlight and WPF really mean.
The biggest challenge was the lack of the Media3D namespace. This prompted me to start building up a library of classes that aren’t included in Silverlight. So far I have created a Point3 (Point3D), Vector3 (Vector3D) and Quaternion (Quaternion). They are all basic implementations at the moment and contain just enough functionality to allow me to create the sample.
To overcome the lack of Viewport2DVisual3D, I calculate the scale for each child control based on it’s depth in the scene. This is a bit of a hack rather than a proper perspective correct transformation as I didn’t have the time to spend creating a camera implementation and setting everything up properly. Instead I make do with a camera focal length and combine that with the z value of each object to calculate how big it should appear on the screen, otherwise you wouldn’t be able to tell which controls are further away from the screen. Using a ScaleTransform ensures that the control appears correctly, but with a sense of depth.
Z-ordering is also taken care of, ensuring items deeper in to the scene appear underneath items which are closer to the screen. There are also a few little extras in there such as being able to animate the rotation of the ellipse, which when played around with can create some awesome effects.
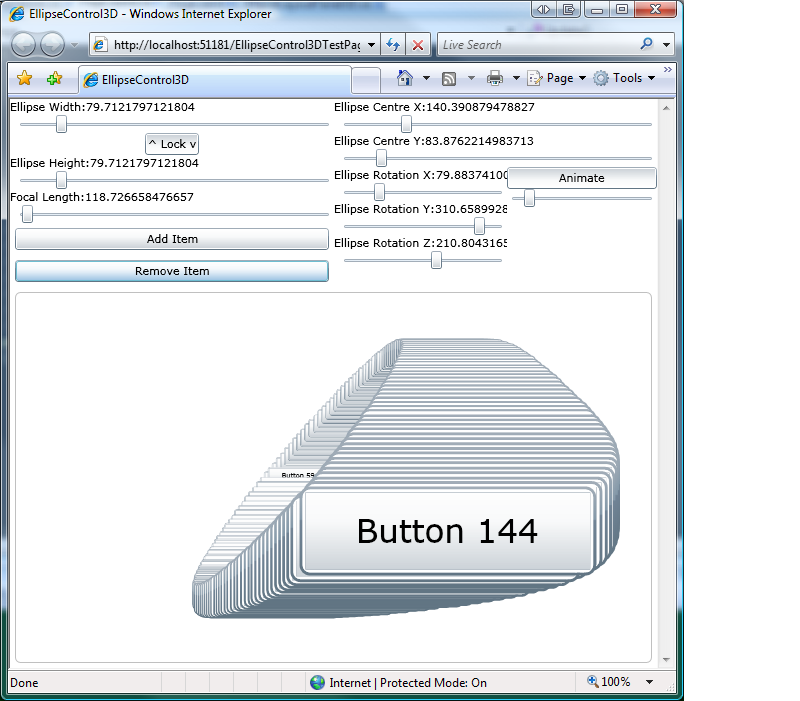
The screenshot below shows the app running in full swing. Animation is enabled and a very small focal length is used, making the objects close to the camera appear much larger than those further back. There were around 200 buttons in the control at the time and it coped really well.
The Idea
The idea of this project is to re-create the WPF Elliptical Layout Control in Silverlight 2.0, giving me a chance to get my hands dirty with Silverlight and to discover what really is the difference between Silverlight and WPF.
After copying and pasting my code in to a new Silverlight project I quickly noticed that my XAML would need a bit of attention, which is when I realised the ‘ElementName’ markup extension used in bindings is not included. I also used this as a chance to add a quick example of animating the rotation of the layout ellipse, as a carosuel isn’t much fun if it doesn’t go around by itself!
The Theory
The lack of ‘ElementName’ is easy to get around by creating a BindingHelper, a well documented topic. Something which took me by suprise was the lack of FrameworkPropertyMetadata which was being used in almost all of my dependency properties. This allowed me to use the FrameworkPropertyMetadataOptions.AffectsArrange value when registering the dependency property, forcing an update of the control when the value of the property changed. To work around this I defined a PropertyChangedCallback method which then goes on to mark the control as needing an update by calling InvalidateMeasure and InvalidateArrange methods. This is defined for any dependency property that will invalidate the control’s state when its value changes and defined in each property’s PropertyMetaData.
private static void EllipseDefinitionPropertyChanged(DependencyObject d, DependencyPropertyChangedEventArgs e)
{
    EllipseLayoutPanel3D ep = d as EllipseLayoutPanel3D;

    if (d != null)
    {
        ep.InvalidateMeasure();
        ep.InvalidateArrange();
    }
}
Another suprise was the lack of a ClipToBounds property, usually found on UIElement. This property is used to determine whether its content can be rendered outside of its bounds (e.g. control with a negative margin in a Canvas), or whether clipping should occur. You can still achieve the same thing in Silverlight, but you have to do a little bit more work. Instead of ClipToBounds we have the UIElement.Clip property of type Geometry. As our control is a plain old rectangle, we just need to create a RectangleGeometry with a Rect which defines the bounds of the control, but because our control can take any size, we need to make sure we update the clip bounds to match.
Getting notified when the width or the height of the control changes is very simple, all we need to do is add a handler to the FrameworkElement.SizeChanged event, in the contrsuctor, and update the Clip property like so:
private void EllipseLayoutPanel3D_SizeChanged(object sender, SizeChangedEventArgs e)
{
    RectangleGeometry rg = new RectangleGeometry();
    rg.Rect = new Rect(0d, 0d, e.NewSize.Width, e.NewSize.Height);
    Clip = rg;
}
The really interesting part of this implementation was getting around the fact that we have no 3D support in Silverlight. In the WPF version of the control I was able to make use of the various 3D controls to do all of the work when it comes to making things appear as if they are sat in a 3-dimensional space. In Silverlight though we do not have this luxury so we have to come up with a way of achieving the same thing. The obvious choice is to setup a 3D pipeline and camera system that we can use to properly calculate the position and scaling of objects as they move toward and away from the screen. The other option is to ignore the camera and take a short-cut for calculating the approximate scale of objects based on their depth.
I decided to take the second option as it’s much quicker and far easier. The problem we are trying to solve is how to determine a scale factor that should be applied to an object such that it appears at a perspectively correct size, i.e. the further in to the scene it is located, the smaller it appears on the screen. Without having a full camera and 3D projection pipeline, I calculate the scale of the object using an approach based on Thales’ Theorem (there’s a great explanation here). This takes in to account the z value (depth) of an object and the focal length for an imaginary camera to calculate the scale of an object. Easy! There is an additonal check in my code which takes a -ve scale and adjusts it so as to avoid any strange rendering behavior. Here’s a look at the code which calculates the scale:
double scale = (-FocalLength / (-FocalLength + rotatedPoint.Z));

if (scale < 0d)
{
    scale = Math.Abs(scale) / 100d;
}
When creating the ScaleTransform, and TranslateTransform, we have to take in to account the position of the layout ellipse to ensure that each child control appears in the correct position and with the correct scale. This is as simple as adding in the position of the layout ellipse’s origin to the control’s position when defining our transforms.
TranslateTransform translate = new TranslateTransform();
translate.X = (rotatedPoint.X) + EllipseCentreX;
translate.Y = (rotatedPoint.Y) + EllipseCentreY;
...
ScaleTransform scaleTransform = new ScaleTransform();
scaleTransform.CenterX = rotatedPoint.X + EllipseCentreX;
scaleTransform.CenterY = rotatedPoint.Y + EllipseCentreY;
scaleTransform.ScaleX = scale;
scaleTransform.ScaleY = scale;
On the topic of transformations, I created a method for asserting a Transform for a UIElement, just like the AssertTransform3D method in the WPF version of the control. The method looks at the RenderTransform property of the given UIElement and if the value is a Transform it is added in to a new TransformGroup which is then set as the value of the RenderTransform property. This TransformGroup is then inspected to see if it contains a Transform matching the type of the generic parameter T. If a match is found, the existing value is replaced with the new value (with the exception of when the new value is a null reference), otherwise the new transform is added to the TransformGroup.
The last thing we have to take care of is the z ordering of each item. Because we are manipulating 2D objects in a 2D space to appear 3D, they are all painted on the same surface. This is important because the order in which the controls are rendered will have an effect on their perceived depth. If one object appears to obscure another object, that object must be closer to the viewer than the object it is obscuring. If in your scene a control that is meant to be deep in to the scene is rendered on top of a control which is meant to be much closer to the screen, the perception of depth will be lost. This was taken care of for us in the Viewport3D control, but not this time. Luckily we can use the Canvas.ZIndexProperty attached property to set the z-index of a particular control. The lower the value, the higher the control appears in the rendering order, i.e. it will be rendered earlier.
The ZIndex property is an int, so we round the z value of the control’s position and use that as the z-index of the control.
Canvas.SetZIndex(child, (int)Math.Round(rotatedPoint.Z));
Animating the layout ellipse’s orientation was easily achieved using a Timer in the main Page hosting the ellipse control, with a period equivalent to 60 frames per second. In the example this value is hard-coded but easy enough to make variable. Each time the timer callback is fired, it updates the value of the rotation sliders by an amount goverened by the speed slider, slidSpeed. Plain and simple.
private Timer animationTimer;

private void tbtnAnimate_Click(object sender, RoutedEventArgs e)
{
    if (tbtnAnimate.IsChecked == true)
    {
        //Start up an animation, running @ 16fps
        animationTimer = new Timer(AnimationTimer_Callback, null, 0, 16);
    }
    else if (animationTimer != null)
    {
        //We're done with animation for now.
        animationTimer.Dispose();
    }
}

private void AnimationTimer_Callback(object state)
{
    Dispatcher.BeginInvoke(Update);
}

private void Update()
{
    double speed = slidSpeed.Value / 100d;

    //For each slider, if the value is off the scale, wrap it back around to 0.
    slidEllipseRotationX.Value = slidEllipseRotationX.Value + 1d > slidEllipseRotationX.Maximum ? 0d : slidEllipseRotationX.Value + speed;
    slidEllipseRotationY.Value = slidEllipseRotationY.Value + 1d > slidEllipseRotationY.Maximum ? 0d : slidEllipseRotationY.Value + speed;
    slidEllipseRotationZ.Value = slidEllipseRotationZ.Value + 1d > slidEllipseRotationZ.Maximum ? 0d : slidEllipseRotationZ.Value + speed;
}
The Solution
Here I present a simple demonstration of the above in the attached solution. The solution contains a simple Page which hosts the custom 3D ellipse layout control. The ellipse layout control is included in the EllipiseLayoutPanel3D class and adds several dependency properties and a few methods to the Panel class. The Missing3D library is included as a dll at the moment, until I get a chance to fix it up. By all means check it out in Reflector, although there’s not much to see there yet.

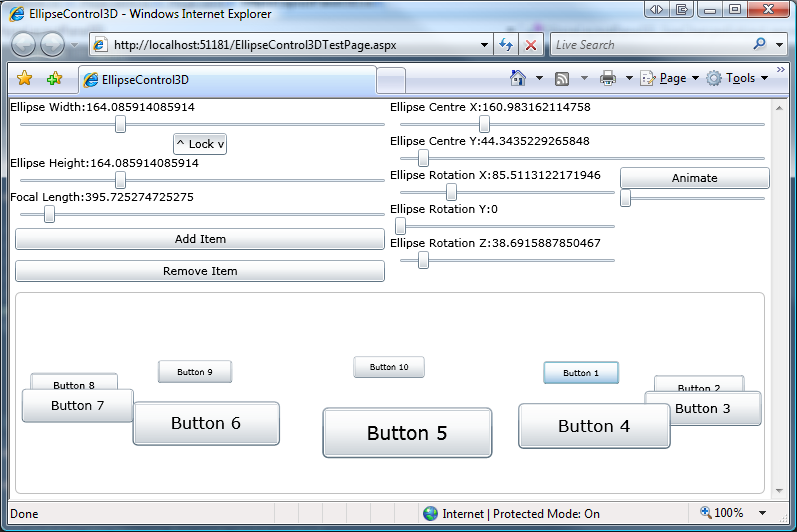
The main Page also contains a few controls which allow you to interact with the layout control, allowing you to specify the size, location and pose of the layout control as well as add or remove items to the control.
With the default orientation of the ellipse when the demo app first runs, changes made to the z-rotation slider will have the effect of spinning the controls around, in the fashion of a carousel.
The control also has a button which toggles animation of the layout ellipse’s orientation by adding a value to each rotation slider every 16 milliseconds, wrapping back around when the end of the slider is reached. Staggering the rotation sliders will give the best effect. The slider underneath the animation button is used to control how much each slider moves on each time period. The further right the slider is the faster the control spins.
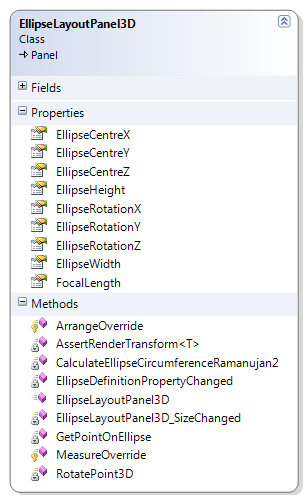
To the right is a class diagram, showing the structure of the layout control. You can see it’s pretty simple and doesn’t need to add much to its FrameworkElement ancestor.
Below is a screen-shot of the demo application in action. The values of the sliders are bound to the ellipse control’s dependency properties via the binding helper. There is a small amount of code behind to handle the locking of the height and width sliders, the add and remove buttons and the animation toggle button.
The code is available for download as a Visual Studio 2008 (SP1) solution (+Silverlight Tools), built against Silverlight 2.0, .Net 3.5 SP1.
Going Forwards
At present the level of user interaction with the control itself is fairly minimal, sure you can interact with items in the control, but there is little in terms of controlling the position of items in the list using the position of the mouse, or any concept of focusing on a particular item etc.
There are many optimizations to be made in the 3D aspects of the demo. The transformation of points and scale calculations could be performed in a pipeline, use of lookup tables for the outputs of the sin and cos functions etc.


Awesome. Exactly what I’ve been looking for — someone who really knows math who has spent time making a flexible carousel.
Thank you!
I’m curious what the story is with EllipseCenterZ. Seems inop. Are you intending to implement it later or am I doing something wrong?
@ Sequoyan
Thank you for your kind comments. With regards to EllipseCenterZ I simply forgot to finish it off :S Thanks for pointing that out!
I have updated the code to include the Z component of the ellipse’s origin (with a slider).
Cheers,
Sam.